Mysql Mac Os X 10.6 Download
 Mac Os 10 10.6 Snowfall Leopard comes with Apache and PHP installed by default. However, the Apache HTTP server is non configured to employ PHP and is non set to run by default. This mail will provide instructions on configuring and starting the built-in Apache server. In improver, this postal service will provide instructions to install MySQL Server and phpMyAdmin.
Enable PHP and Commencement the Apache HTTP Server
- Make sure that PHP support is enabled on Apache
- Open "/etc/apache2/httpd.conf" and search for:
#LoadModule php5_module libexec/apache2/libphp5.so
- Uncomment the line by removing the # graphic symbol at the beginning.
- Save the changes.
- Open "/etc/apache2/httpd.conf" and search for:
- Start the Apache Server
- Go to System Preferences > Sharing and check/uncheck Web Sharing to first/stop Apache server. Note that this setting volition persist fifty-fifty if you reboot the mac.
- Or by control line, execute either of the post-obit commands:
sudo apachectl start
sudo apachectl restart
- The Apache docroot is set to the "/Library/WebServer/Documents/" binder. In addition, a relative dwelling page (ex: http://localhost/~yourusername") is set to the "~/Sites" or "/Users/yourusername/Sites" binder.
- To verify that PHP is working under Apache, create a file "/Library/WebServer/Documents/phpinfo.php" with the following content:
<?php
// Bear witness all information on PHP
phpinfo ( ) ;
?> - Browse to the PHP info script using http://localhost/phpinfo.php. You should see a agglomeration of info concerning your PHP installation if Apache is configured to use PHP correctly.
- If y'all have problems, check the Apache "error_log" in the "/var/log/apache2" directory.
Install and Offset MySQL Server
- Download the latest MySQL Server distribution; I selected the "Mac OS 10 ver. 10.half dozen (x86, 32-bit), DMG Archive" package.
- Double-click to mount the "mysql-5.1.46-osx10.vi-x86.dmg" downloaded disk prototype file. Double-click on the resulting "mysql-v.one.46-osx10.6-x86.pkg" package file to install MySQL Server.
- The MySQL Server volition be installed under the "/usr/local/mysql-five.one.46-osx10.6-x86" directory. In addition, a symbolic link to that directory is created as "/usr/local/mysql".
- Install the "MySQLStartupItem.pkg" package file also to facilitate starting and stopping the MySQL Server. This will besides configure MySQL Server to start on bootup.
- Start the MySQL server by running "sudo /Library/StartupItems/MySQLCOM/MySQLCOM start". (Yous may be prompted to input a countersign; this password is the Mac OS X admin password, not the MySql root password which is bare past default.) Later, you tin stop the MySQL Server with "sudo /Library/StartupItems/MySQLCOM/MySQLCOM stop".
- Add the following line to the stop of your "~/.profile" to facilitate executing mysql commands:
export PATH=$PATH:/usr/local/mysql/bin
- Connect to the MySQL Server past trying out these commands in a concluding:
mysql -u root --version
mysql -u root -p
mysql> testify databases;
mysql> use mysql;
mysql> testify tables;
mysql> quit
Install phpMyAdmin
- phpMyAdmin requires that the PHP mcrypt extension be installed for performance and for 64-bit operating systems such as Snow Leopard. We will have to compile it from source.
- I think you will need to install Xcode from Apple in society to compile the mcrypt extension. If y'all run into problems beneath without Xcode, try installing Xcode and so repeating the procedure.
- Download the latest libmcrypt .
- Unpack the downloaded file "libmcrypt-2.5.viii.tar.gz" past double-clicking information technology in the ~/Downloads directory.
- Run the following commands in a terminal:
cd ~/Downloads/libmcrypt-2.5.8/
./configure --disable-posix-threads --enable-static
make
sudo make install - Input your Mac Os X root password if yous are prompted to input a password.
- Download the PHP source code then we can generate the mcrypt PHP extension.
- First determine your currently installed PHP version past opening Last and running "php -version".
- Unfortunately for me, the latest PHP source version on the website is v.iii.2 and my installed version is 5.3.1. To go the source for my specific version, I copied the link out, which is "http://www.php.cyberspace/get/php-5.3.2.tar.bz2/from/a/mirror".
- I manually edited the link to change "5.3.2.tar" to "5.3.one.tar", pasted the modified link back into the browser, and downloaded the source for 5.3.1.
- Unpack the downloaded file "php-five.iii.one.tar.bz2" by double-clicking it in the ~/Downloads directory.
- Run the post-obit commands in a final:
cd ~/Downloads/php-five.3.one/ext/mcrypt
phpize
./configure
make
cd modules
sudo cp mcrypt.so /usr/lib/php/extensions/no-debug-non-zts-20090626 / - Input your Mac Os 10 root password if you are prompted to input a password.
- Configure PHP to load the mcrypt extension.
- Create the "/etc/php.ini" file if information technology doesn't already exists (copy from "/etc/php.ini.default") and edit it.
cd /etc
sudo cp php.ini.default php.ini
sudo half-dozen php.ini - Input your Mac Os Ten root password if yous are prompted to input a password.
- Search for ";extension=" in php.ini. When y'all find the "Dynamic Extensions" section, add the post-obit line to the end of that section like so:
;extension=php_xsl.dll
;extension=php_zip.dll
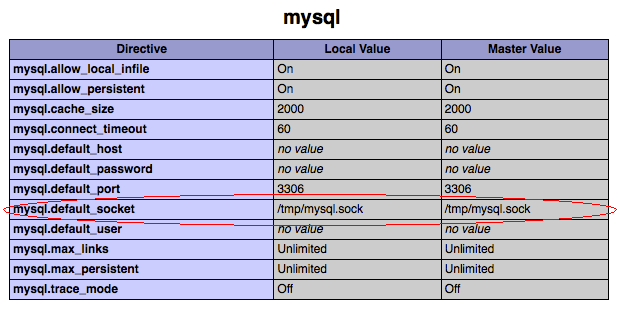
extension=mcrypt.so - MySQL Server nether Mac Bone Ten puts its socket file under "/tmp/mysql.sock". Nosotros'll need to adjust the php.ini to point at this location instead of the default "/var/mysql/mysql.sock". Search for and fix the following variables in php.ini:
pdo_mysql.default_socket=/tmp/ mysql .sock
mysql .default_socket = /tmp/ mysql .sock
mysqli.default_socket = /tmp/ mysql .sock - Enable php error logging by searching for and enabling these variables in php.ini:
error_log = /tmp/php_errors
- Do not create the php_errors file; PHP will create information technology with the appropriate permissions. Note that putting php_errors log file in a directory other than the "/tmp" directory (like "/var/log/apache2") may not piece of work due to permission bug.
- Create the "/etc/php.ini" file if information technology doesn't already exists (copy from "/etc/php.ini.default") and edit it.
- Restart the apache server by running the "sudo apachectl graceful" command.
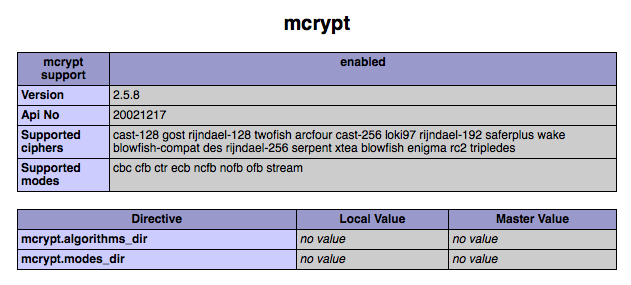
- Browse to the PHP info script using http://localhost/phpinfo.php. Search for "mcrypt" and you will at present see a section containing info concerning it. You lot should see that the "mcrypt support" row has an "enabled" value.
- Search for "mysql" and double-check that three "default_socket" variables are using "/tmp/mysql.sock", instead of the default "var/mysql/mysql.sock".
- Download the latest phpMyAdmin.
- Unpack the downloaded file "phpMyAdmin-3.3.three-english.naught" by double-clicking information technology in the ~/Downloads directory.
- Re-create the resulting "phpMyAdmin-three.iii.iii-english" folder to "/Library/WebServer/Documents". I suggest renaming the folder to merely "phpMyAdmin".
- Make a re-create of "/Library/WebServer/Documents/phpMyAdmin/config.sample.inc.php" in the same directory and name the copy every bit "config.inc.php".
- Edit "config.inc.php" and change the "AllowNoPassword" variable to truthful. This volition allow us to login with MySQL user "root" and a blank password.
$cfg [ 'Servers' ] [ $i ] [ 'AllowNoPassword' ] = truthful ;
- Scan to http://localhost/phpMyAdmin/. Log in with user "root" and leave the password field bare.
Alternatively, you could just employ XAMPP or MAMP which also includes MySQL. However, I have a preference not to install software if I don't have to.
Content in a higher place derived from the following online resources:
Mysql Mac Os X 10.6 Download
Posted by: vinsonbecampar.blogspot.com


0 Comments